Free shipping to every country in the world! (Check conditions)

When and why should you change your bike chain?
When and why should you change your bike chain?
The your bike chain is one of the most crucial parts for optimal operation. However, it is common for many cyclists to overlook it until a problem arises. In this article, we will explain When and why to change your bike chain, and how this simple act of maintenance can save you time, money and headaches in the future.
Why is it important to change your bike chain?
The CHAIN The chain is the part of your bike that transfers the force from your pedals to the wheels, allowing movement. Over time, the chain undergoes natural wear and tear due to use and exposure to elements such as dust, water, and dirt. This wear and tear can affect your bike's performance in several ways:
- Loss of efficiency: A worn chain can slip on the sprockets, resulting in a loss of power when pedaling.
- Damage to other components: If the chain is too worn, it can cause premature wear on the sprockets and chainrings, which could result in costly repairs.
- Increased risk of breakage: A chain in poor condition is more likely to break during use, which can leave you stranded at the worst possible time.
For these reasons, it is crucial to keep an eye on the condition of the chain and change it when necessary.
When should you change your bike chain?
The right time for changing the chain on your bike It can vary depending on a number of factors, such as how often you ride, the conditions you ride in, and the type of chain you use. However, there are some clear signs and general guidelines that can help you determine when it's time to do so:
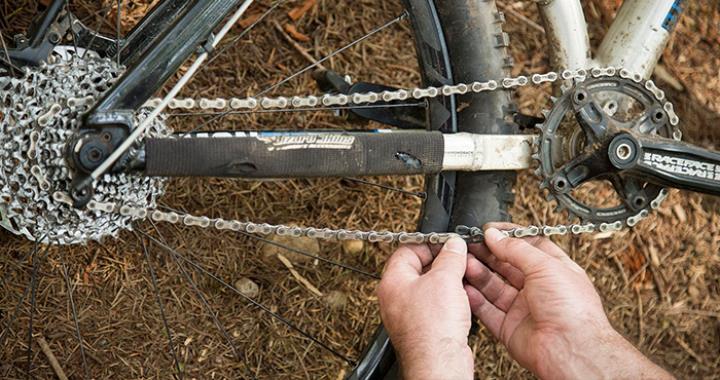
1. Chain length and wear
The most common method to check if a chain needs replacing is to measure its elongation. As the chain wears, the links stretch, affecting the overall length of the chain. To measure this, a chain measuring tool is used, which will tell you if the chain has reached its wear limit. Generally, it is recommended to change the chain when the elongation is 0.5% on road bikes and 0.75% on mountain bikes.
Measuring chain stretch is a simple process. First, place your bike on a stand so that the rear wheel is elevated. Then, place the chain measuring tool on two links of the chain. If the tool fits perfectly or if it shows stretch within the ranges mentioned, it's time to consider replacing it.
It is important to remember that each chain manufacturer may have specific recommendations regarding the maximum allowable elongation. Therefore, it is advisable to consult the manufacturer's guide or a professional if you have any doubts.
2. Visible wear
Another sign that it's time to changing the chain on your bike is visible wear. This includes links that are bent, damaged or showing signs of corrosion. If you notice that your chain is visibly worn, don't wait any longer to replace it.
Visible wear can manifest itself in a number of ways. Links may start to show signs of rust, especially if the bike has been exposed to wet conditions or has not been properly cleaned. Additionally, some links may appear thinner or even bent. This type of wear not only affects the performance of the bike, but also increases the risk of the chain breaking during use.
Regularly inspecting your chain is a good practice to avoid unpleasant surprises during a ride. If you notice any signs of wear, it is best to change the chain immediately to avoid further damage to your bike's drivetrain.
3. Transmission performance
If you notice that your bike shifts harshly or inefficiently, or if the chain skips when you pedal hard, these are signs that your chain may be worn. While these problems can be caused by other factors, such as a poorly adjusted derailleur or worn sprockets, it's a good idea to check your chain first.
A chain in good condition should move smoothly between the sprockets and chainrings without making excessive noise or skipping. If you experience difficulty shifting gears or hear clunking noises when pedaling, the chain may be worn and need to be replaced.
Additionally, if you have recently changed other drivetrain components, such as sprockets or chainrings, it is advisable to also change the chain to ensure that the entire system is working optimally.
Recommended brands for bicycle chains
When you decide changing the chain on your bike, it is important to choose a trusted brand that guarantees durability and performance. Below, we recommend some of the best brands available in our store:
- KMC: Renowned for their high quality and reliability, KMC offers chains compatible with different transmission systems. KMC chains are known for their durability, wear resistance and smooth shifting, making them a popular choice for both recreational and professional cyclists.
- SRAM: Ideal for those seeking superior performance, especially on mountain bikes. SRAM chains are designed to withstand demanding conditions and offer an excellent weight-to-strength ratio, ensuring precise and reliable shifting.
- SHIMANO: One of the most popular and trusted brands, Shimano offers chains for all types of bikes. Their chains are known for their compatibility with a wide range of drivetrains and their ability to maintain consistent performance even under the toughest conditions.
- CAMPAGNOLO: Known for its innovation and precision, Campagnolo is an excellent choice for demanding cyclists. Campagnolo chains are designed to offer maximum efficiency in power transmission, ensuring smooth and efficient pedaling on every ride.
How to change the chain on your bike?
Changing your bike chain is a task you can do yourself with the right tools and knowledge. Here are the basic steps:
1. Necessary tools
FOR changing the chain on your bike, you will need the following tools:
- A chain tool (chain breaker).
- A chain wear gauge.
- A quick link, if your chain requires it.
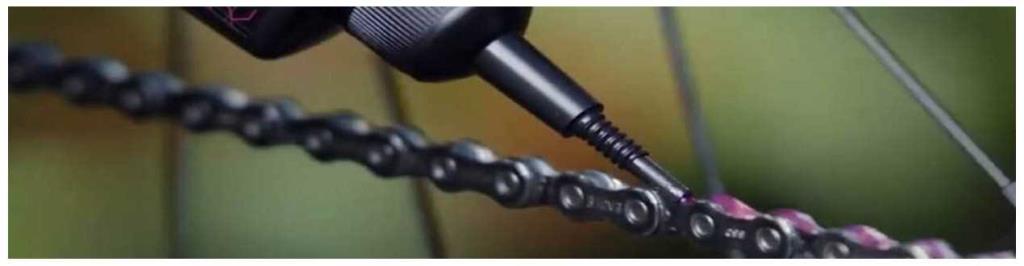
2. Remove the old chain
First, place the chain on the smallest cog and the largest chainring. Then, use the chain tool to remove a link and separate the chain. Make sure to save the quick link if your chain has one.
Before removing the old chain, it is advisable to clean the drivetrain to prevent dirt and debris from coming into contact with the new chain. You can use a degreaser and a brush to remove any dirt that has built up on the sprockets and chainrings.
Once the chain has been removed, it is important to measure the length of the old chain to compare it to the new one. If the old chain has experienced significant elongation, you should adjust the length of the new chain before installing it.
3. Install the new chain
Measure the new chain against the old one to make sure it's the correct length. Place the new chain on the sprockets and chainrings, and use the chain tool to join the links together. If you're using a quick link, make sure it's positioned properly and secure.
It is essential that the chain is correctly aligned with the sprockets and chainrings during installation. Poor alignment can cause premature wear and affect drivetrain performance. If you are unsure how to do this, it is advisable to consult a tutorial or go to a specialist workshop.
Once the chain is installed, check that all links are in place and that there are no friction points. This will ensure smooth operation and prolong the life of the chain.
4. Adjustment and testing
Once the new chain is installed, test the transmission by shifting gears and making sure everything is running smoothly and efficiently. If you notice any problems, check that the chain is correctly installed and adjusted.
During the test, it is important to pedal under different stress levels to ensure that the chain does not jump or make strange noises. If everything works correctly, you can be sure that the installation has been successful.
After the test, perform a final visual inspection of the chain to verify that all links are in good condition and that the chain is properly tensioned. If necessary, make additional adjustments.
Additional tips for chain maintenance
Keeping your bike chain in good condition isn't just about replacing it when it's worn. Regular maintenance can extend the life of your chain and improve your bike's performance. Here are some additional tips:
1. Regular cleaning
Regular chain cleaning is essential to prevent the build-up of dirt and debris that can accelerate wear. Use a chain-specific degreaser and a brush to remove dirt. After cleaning, be sure to dry the chain thoroughly before applying lubricant.
2. Proper lubrication
Applying chain lubricant is essential to keep it running smoothly. Use a specific bike chain lubricant and apply it evenly to all links. After applying, remove excess lubricant with a clean cloth to prevent it from attracting more dirt.
3. Periodic inspection
Perform regular inspections of the chain for signs of wear or damage. If you notice that the chain is starting to show signs of wear, it is best to replace it before it causes damage to other drivetrain components.
Conclusion
Know When and why to change your bike chain It is essential to keep your bike in top condition. Not only will you avoid mechanical problems, but you will also improve your riding experience. Remember to check your chain regularly and don't hesitate to change it when you notice the first signs of wear.
If you need a new chain, don't forget to explore the high-quality options in our store, such as those from KMC, SRAM, SHIMANO, Y CAMPAGNOLO.
Don't wait any longer and ensure the performance of your bike with a new, quality chain!
-
 Types of bicycle chain lubricants and their common uses
Explore the different types of bike chain lubes and how to choose the right one for each terrain condition. Learn...Read more
Types of bicycle chain lubricants and their common uses
Explore the different types of bike chain lubes and how to choose the right one for each terrain condition. Learn...Read more -
 Bicycle Brake Maintenance: Tips and Type Details
Find out how to keep your bike brakes in perfect condition with our comprehensive guide. Learn about the different...Read more
Bicycle Brake Maintenance: Tips and Type Details
Find out how to keep your bike brakes in perfect condition with our comprehensive guide. Learn about the different...Read more -
 How to Choose the Ideal Air Pump for Your Bike. Complete Guide
Learn how to choose the ideal air pump for your bike. Explore the different types of pumps, their features, and how...Read more
How to Choose the Ideal Air Pump for Your Bike. Complete Guide
Learn how to choose the ideal air pump for your bike. Explore the different types of pumps, their features, and how...Read more